
To integrate the Firebase services into Flutter applications, we have a command line tool called “FlutterFire CLI“; it is meant to make the integration process easy for developers. Developers can use the FLutter Fire CLI to quickly make available the various backend services of Firebase for their Flutter projects, such as authentication, cloud storage, and more. Key Features of FlutterFire CLI are cross-platform support, helping to initialize various Firebase services, automation, mitigating the chances of configuration errors, offering a straightforward command-line interface, and providing up-to-date Firebase configuration.
This tutorial teaches the steps for downloading and installing FlutterFire CLI on Windows 11 or 10…
What do we need to follow this tutorial?
- Windows 11 or 10
- We also required Nodejs and Flutter SDK, which we learned how to install in this tutorial.
- Administrator user access
- Active Internet Connection
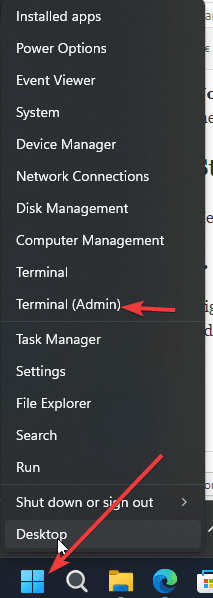
Step 1: Run Windows Terminal as Admin
We will use the command line to install FlutterFire CLI on Windows; therefore, click on the Start Menu and select “Terminal (Admin)” or “PowerShell (Admin).”
Step 2: Install the Chocolatey Package manager
Instead of roaming around here and there on different websites to download the required packages and tools for installing FlutterFire CLI, the best way is to use some package manager. Therefore, we will use the famous “Choco” as a reference.
Copy the whole block of the given command and paste it into the Terminal or PowerShell.
Set-ExecutionPolicy Bypass -Scope Process -Force; [System.Net.ServicePointManager]::SecurityProtocol = [System.Net.ServicePointManager]::SecurityProtocol -bor 3072; iex ((New-Object System.Net.WebClient).DownloadString('https://community.chocolatey.org/install.ps1'))The above command will install the Choco; once the process is completed, close the “Windows Terminal or PowerShell” and start it again by right-clicking on the Start button, as shown in Step 1.
Step 3: Install Firebase CLI
We need Nodejs and its package manager NPM to get the Firebase CLI. Both can be on Windows by running a single command of Choco; here is what to follow:
choco install nodejs
After successfully installing the Nodejs, close and open the Windows Terminal or PowerShell with Admin rights.
Now, we will use NPM to install Firebase CLI globally:
npm install -g firebase-toolsWith the completion of the above command, our system will have the Firebase; to confirm, we can check its version:
firebase --versionStep 4: Log in to Firebase CLI
Now, we have FireBase, but to use its features, we need to login to our Firebase account on our Windows terminal using the Firebase CLI. Run the given command; it will open the browser on your system and direct you to the Firebase authentication page. Here’s what you need to do:
firebase loginSign in with your Google Account that is associated with your Firebase projects. Also, you may be asked to grant permission to the Firebase CLI to access your Google account.

Step 5: Install Dart on Windows 10/11
The next thing we need is Dart SDK to install FlutterFire CLI because it is written in Dart. We can also use the Choco to download and install it without visiting any website.
choco install dart-sdk
Step 6: Install FlutterFire CLI on Windows
Finally, we have all the necessary dependencies to install FlutterFire on Windows 10 or 11. We can now use the dart command to download the files needed to set up FlutterFire CLI easily.
dart pub global activate flutterfire_cli
Step 7: Check FlutterFire CLI Version
To be sure that we have successfully installed the FlutterFile CLI on our Windows, execute the given command. It will show the current version of this tool on our terminal.
flutterfire --version
Using FlutterFire CLI
Now that we have installed the FlutterFire CLI, to configure Firebase for Flutter projects, navigate to your Flutter project directory and run:
flutterfire configureSo, that’s it. We successfully installed the FlutterFire CLI by following this guide on our Windows 11 testing system, and we hope it has also worked for you. If you are facing any problems, let us know.
Other Articles:
Related Posts
How to Archive a WhatsApp Conversation Without Deleting
How to Clear or Delete Archived Emails in Gmail
How to Clear Google Search History?
2 best Android Apps to open zip or archive files on the smartphone
How to use the XLOOKUP function in Microsoft Excel with Example
How to set up an out-of-office responder on Gmail? Step-by-step guide on setting up a Vacation responder