
Telnet is a network protocol that allows remote control over a computer or device using a command-line interface. Developed in the late 1960s, it provides a way to communicate with remote systems by establishing bidirectional interactive text-oriented communication. Although more secure protocols like SSH have mainly replaced it, Telnet remains valuable for troubleshooting, testing network services, and accessing legacy systems. Its simplicity and directness make it a handy tool for network administrators and IT professionals who need to connect to and manage remote servers and devices quickly.
In this article, we learn how to install Telnet Client on Windows 11 and 10 using the PowerShell command line.
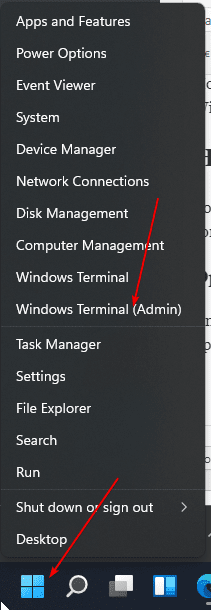
Step 1: Open Terminal or PowerShell
Depending on Windows 11 or 10, right-clicking on the Windows Start button will either provide the Windows Terminal (Admin) or PowerShell (Admin) option. Choose whatever is available to get command-line access to your system with administrator rights
Step 2: Install and Enable Telnet Clinet
After having the PowerShell access, execute the given DISM command to enable the Windows built-in “Telnet Client” feature.
dism /online /Enable-Feature /FeatureName:TelnetClient
Step 3: Restart your Windows 11 or 10 system
By completing the previous step’s command, the system will ask you to restart to apply the changes you have made recently. Either press “Y” on the command line and hit the “Enter” key or manually restart the system from the Start menu.
Step 4: Verify the Installation
To ensure that the Telnet client has been installed successfully, on our PowerShell or Terminal type the given command to see the options available to use with it. This will confirm that Telnet has been installed on Windows 11 system successfully.
telnet --help
Step 5: Connect to a Remote Server
To start the Telnet command line, we can simply type -“telnet” this will switch the current session to telnet.

Whereas to directly connect to remote IPaddress or hostname of a server, we can use the given command syntax. Also, add the port number if it is not the default Telnet port (23).
telnet [hostname or IP address] [port]For example, to connect to a server with the IP address 192.168.1.10 on the default port, you would type:
telnet 192.168.1.1Once the connection is established, the telnet will ask to enter the username and password of the remote server you want to access.
Other Articles:
Related Posts
How to use the XLOOKUP function in Microsoft Excel with Example
Check the RAM type on Windows 11 or 10. See what DDR RAM you have on your PC in different ways
How to Check Firmware in CMD on Windows 11 or 10
How to Change WIFI or Ethernet MAC address on Windows 11 or 10?
How to Install 7-Zip on Windows 11 or 10 with Single Command
Install Google Earth on Windows 11 or 10 Using a Single Command