
Google Earth in Windows is a powerful application that allows users to explore detailed satellite imagery, maps, and 3D representations of Earth. With Google Earth, a user can:
- View high-resolution images of any location on the globe.
- Navigate through 3D landscapes and cities.
- Discover geographical data, historical maps, and guided tours. It’s a versatile tool for education, travel planning, and virtual exploration.
Now, let’s learn how to use the command line to install Google Earth Pro on Windows 11 or 10.
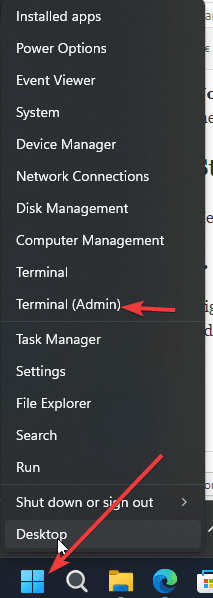
Step 1: Access Windows PowerShell or Terminal
Let’s access PowerShell or Terminal (Admin). To do so, right-click the Windows Start button and select the available option.
Step 2: Install Google Earth using Winget
Windows 11 and 10 have a default package manager called “Winget.” The good thing is that “Google Earth Pro” is available to install using it. Therefore, on your Windows command terminal, execute the following widget syntax.
winget install Google.EarthProStep 3: Run Google Earth Pro on Windows 11 or 10
After completing the installation command using Winget, go to the Windows Start menu and search for it. As its icon appears, click to run it.

Finally, you have installed it to explore the different countries, terrains, and places on Earth.

Uninstallation
If you want to remove Google Earth from your Windows system later, you can also use Winget. Here is the command to uninstall this software.
winget uninstall Google.EarthProInstalling Google Earth on your Windows 11 or 10 PC using PowerShell or CMD is easy. Your computer screen will be enough for educational purposes, planning trips, or satisfying your curiosity. It opens up a world of exploration and learning.
Other Articles:
Related Posts
How to use the XLOOKUP function in Microsoft Excel with Example
Check the RAM type on Windows 11 or 10. See what DDR RAM you have on your PC in different ways
How to Check Firmware in CMD on Windows 11 or 10
How to Change WIFI or Ethernet MAC address on Windows 11 or 10?
How to Install 7-Zip on Windows 11 or 10 with Single Command
Install Google Earth on Windows 11 or 10 Using a Single Command